DIY Glass Box Christmas Decor – Six Easy Looks
This year, I took one simple glass box from Hobby Lobby and gave it six Christmas makeovers…all low-maintenance, all easy to swap, and all using decorations I already had on hand or were cheap to purchase. It’s one of my favorite quick holiday projects because you get multiple looks without needing an entirely new set of décor.
Below are the six themes I created inside the same glass box:
1. Bells & Bows
2. Nativity
3. Gingerbread
4. JOY
5. Christmas Trees
6. Present
Each one takes only a few minutes to assemble and can be switched out throughout the season.
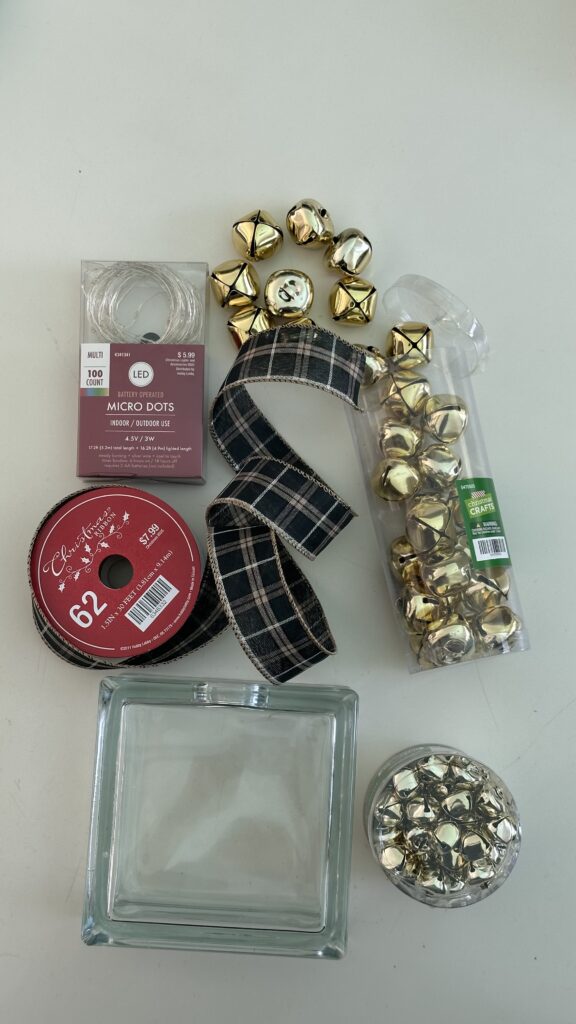
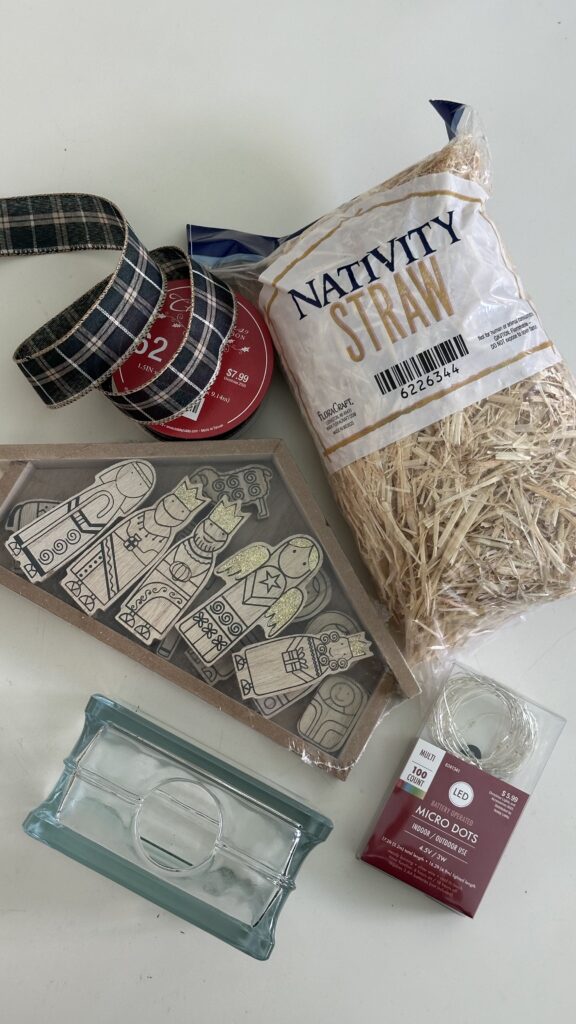
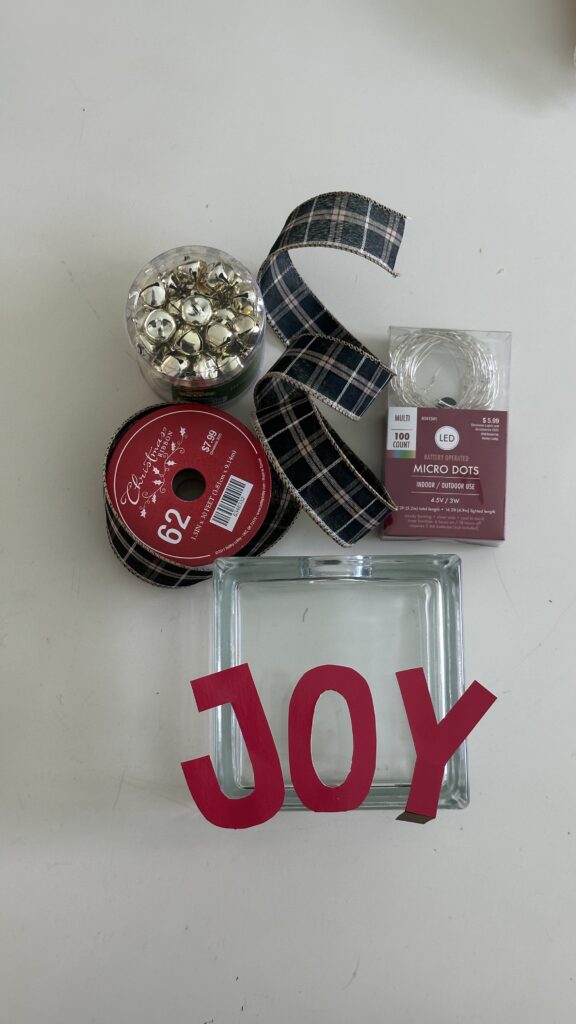
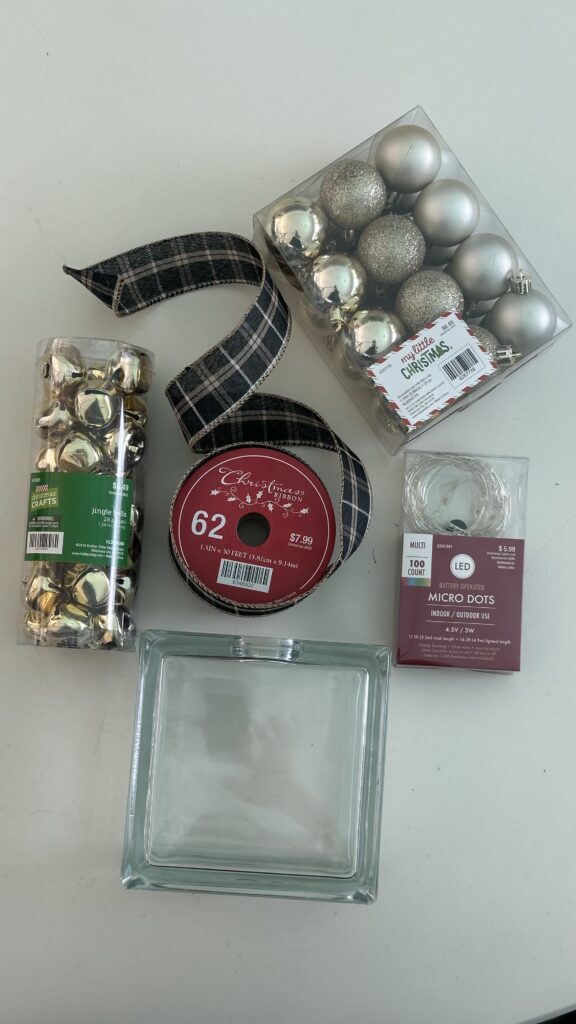
SUPPLIES
– Glass box (Hobby Lobby)
– Ribbon and rope lights
– Bells, ornaments, pinecones, faux snow, or any accents you prefer
– Cardstock (for letters or cutouts)
– Tape, tacky putty, or temporary glue dots (optional for securing pieces)
– Tweezers or chopsticks (optional but very helpful for placement)
THE SIX DESIGNS
1. BELLS & BOWS
This look is classic, timeless, and incredibly easy — just bells, lights, and ribbon.
– Fill the glass box with bells in mixed sizes or all small bells. As you add the bells, wrap or tuck rope lights as you add the bells to add subtle glow.
*Note:* Avoid using only large bells — you’ll end up with noticeable gaps.
– Tie a ribbon bow around the box or attach one at the top.
– To complete the display, I added pinecones and a wooden disc
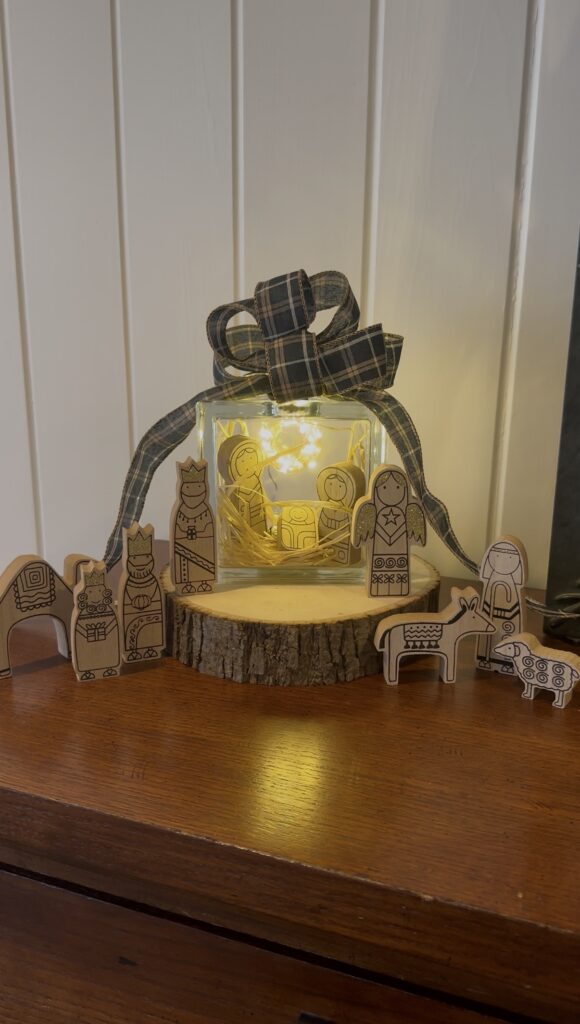
2. NATIVITY
This one turned into something really meaningful and special.
– Add a small handful of hay or shredded brown paper for texture.
– Place mini wooden nativity figures inside the box.
– Use rope lights to create a soft **halo effect** behind baby Jesus. This was one of my favorite details — a quiet reminder of the true meaning of Christmas.
– Add a bow at the top if desired.
– To complete the display, I added the rest of the nativity figures around the box.
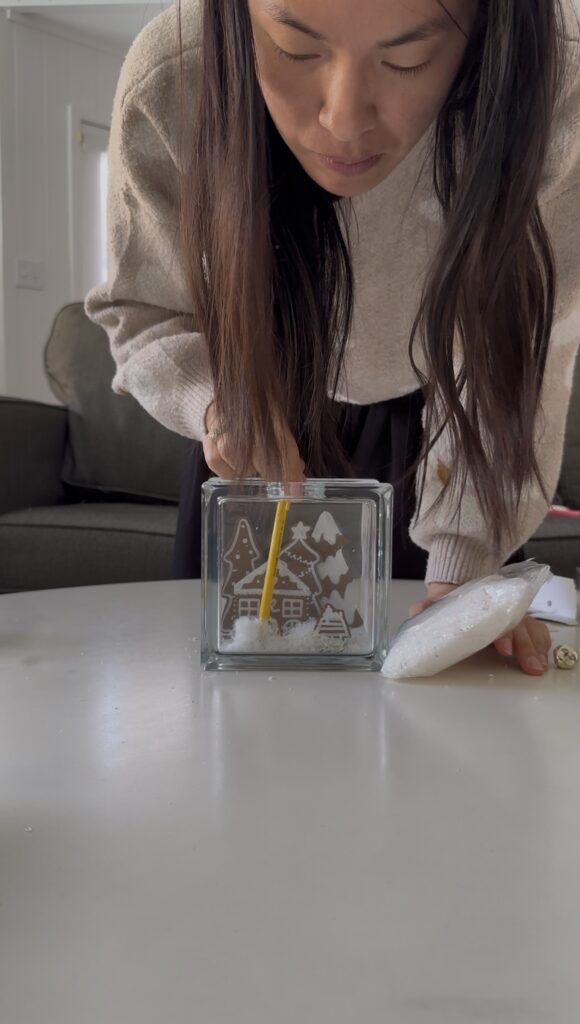
3. GINGERBREAD VILLAGE
This one is whimsical and nostalgic, and it ended up being one of my favorites because of the little Snoopy moment.
– Cut cardstock pieces and draw on them with white marker to create houses, trees, gingerbread men, or decorations. My favorite part was adding **Snoopy on top of a gingerbread doghouse**.
– Add faux snow to the bottom of the box before assembling the paper pieces.
– To complete the display, I added pinecones, lights and a wooden disc
**Important tip:** Do not rely on tape alone to anchor the cardstock. It’s too frustrating to keep them from shifting as you add snow or additional pieces.
Instead:
– When cutting your cardstock houses and trees, leave a small tab at the bottom.
– Fold the tab backward, and tape something with weight (like a bell or coin) to the tab.
– Place the tabbed piece inside the box. The faux snow hides the anchor entirely!
This same technique is helpful for the JOY letters in design #4.
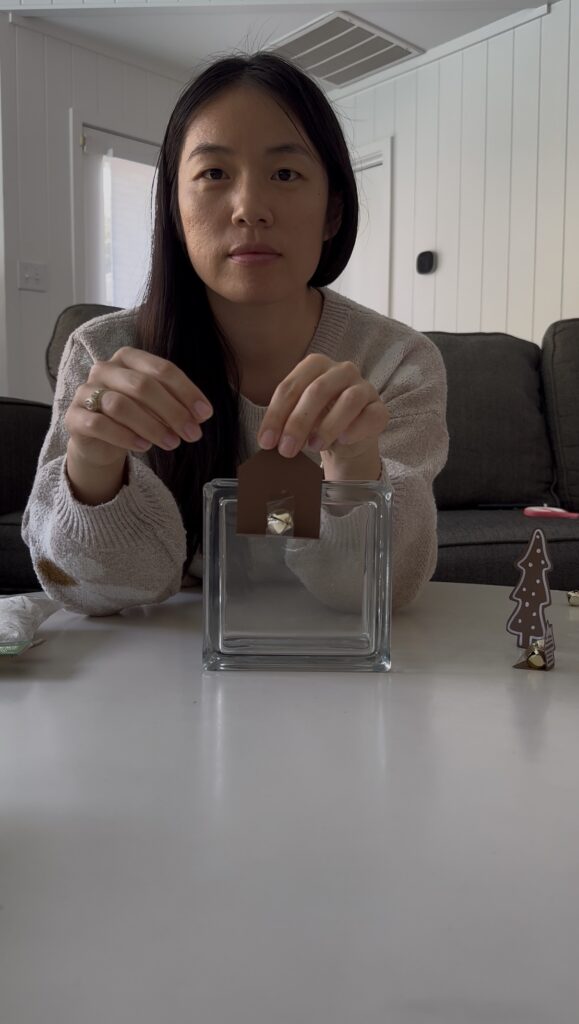
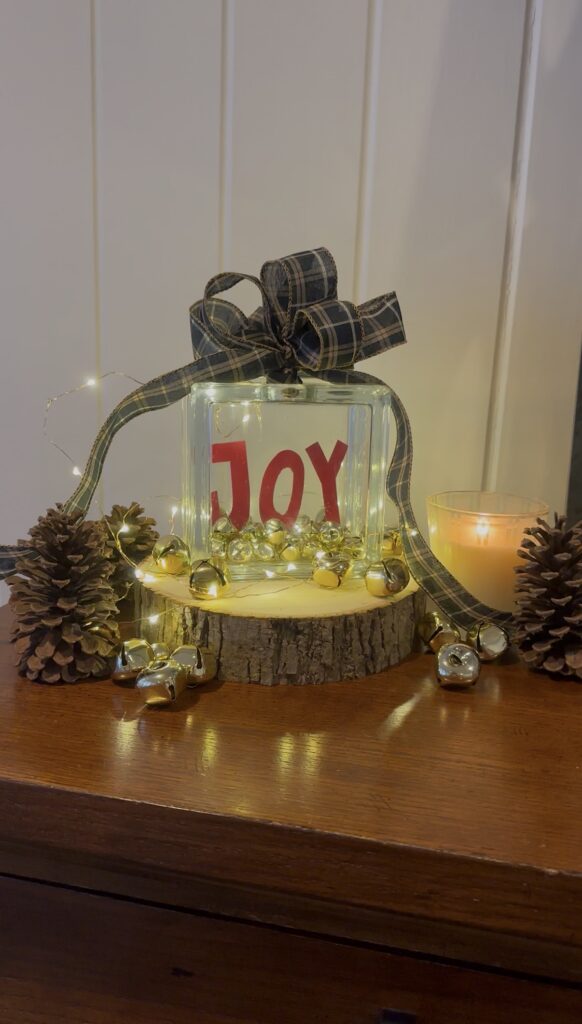
4. JOY LETTERS
A clean, simple, modern look that requires very little material.
– Cut out the letters J-O-Y from red cardstock.
– Use the same weighted tab trick from the gingerbread design so they stand upright inside the box.
– Add small bells or faux snow around the bottom.
– Rope lights make this one glow beautifully from behind.
– To complete the display, I added pinecones, bells, lights and a wooden disc
**Helpful tool:**
Use tweezers or chopsticks to position the letters — it saves a lot of frustration.
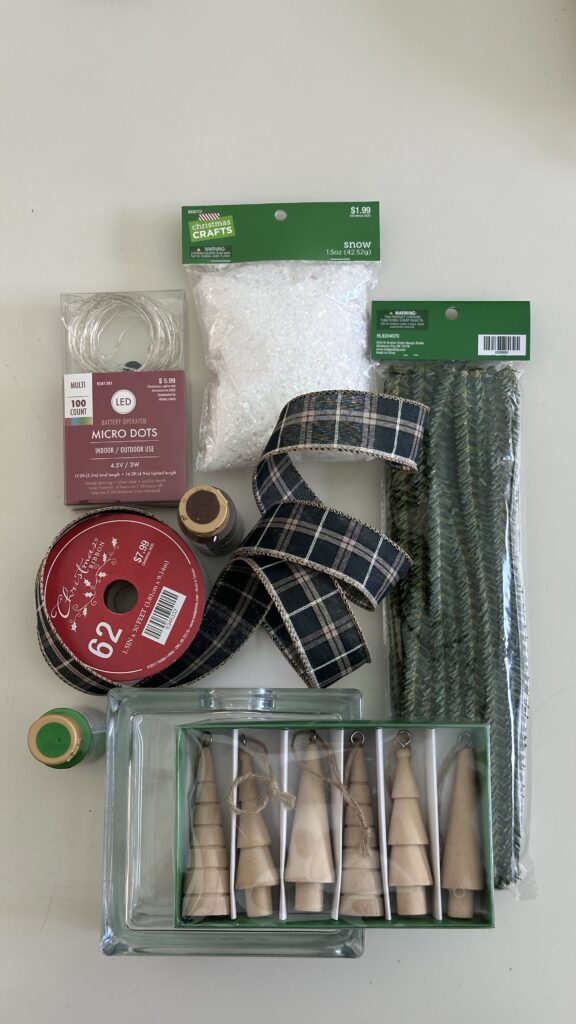
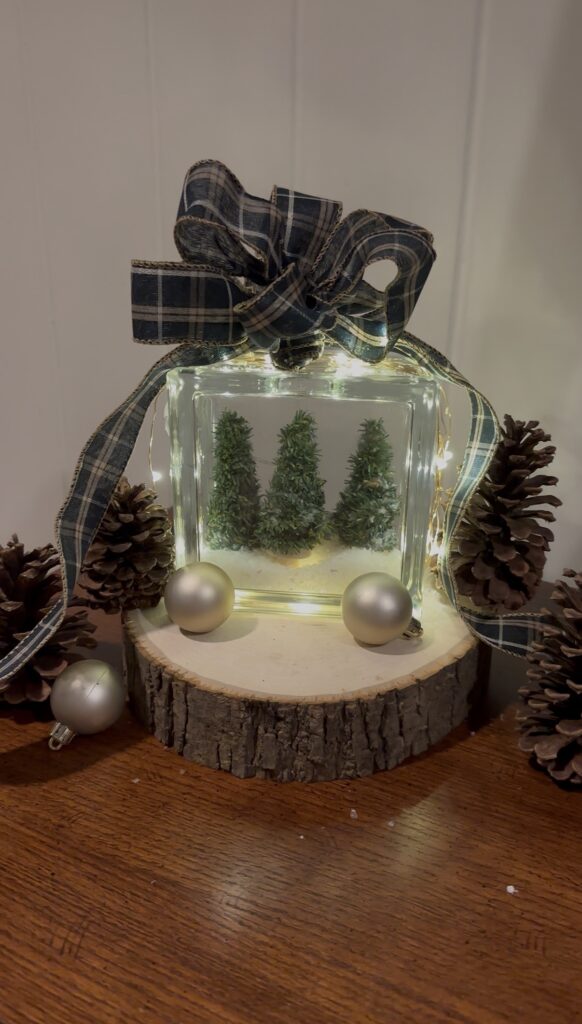
5. CHRISTMAS TREES
This one has a “mini snow globe” vibe — cozy and cute.
– Use small bottlebrush trees or make your own using pine pipe cleaner twisted into shape.
– Add faux snow along the bottom.
– Add lights around the edges or weave them softly behind the trees.
– I didn’t add ornaments to my mini trees because I wanted a more natural look — but tiny felt or bead ornaments would be adorable too!
– To complete the display, I added pinecones, ornaments and a wooden disc
6. PRESENT
This one is so creative and was one of my favorites to style.
– Turn the glass box on its side so it resembles a gift box.
– Fill with a mix of small ornaments and small bells. (Large ornaments alone will leave big gaps, so mix sizes or stay small.)
– Wrap the outside with ribbon just like you would wrap a present.
– Add a bow on top
– To complete the display, I added ornaments, a wooden disc, and some cute diy wooden houses
TIPS FOR SUCCESS
– Mix ornament sizes to avoid empty pockets inside the box.
– Use rope lights creatively — halos, backlighting, or wrapping edges all work beautifully.
– Weighted cardstock tabs are your best friend for stability.
– Tweezers or chopsticks make placement much easier in a narrow box.
– Turn the box on its side for instant “gift box” vibes.
– Keep the decorative add-ins simple so each look is quick to swap out.
CLOSING THOUGHTS
This little glass box ended up being one of my favorite Christmas projects. It’s endlessly customizable, easy to refresh throughout December, and looks adorable on shelves, mantels, and entryway tables.
If you make your own version or try one of these six looks, tag me on Instagram at @cheerstomonday. I absolutely love seeing your creativity.
SEO META DATA
**Meta Title:** DIY Glass Box Christmas Decor – Six Easy Holiday Looks
**Meta Description:** Learn how to style one glass box into six Christmas décor designs — bells, nativity, gingerbread village, JOY letters, Christmas trees, and a present. Easy, customizable holiday project.
**Keywords:** glass box decor, Christmas decor DIY, holiday vignette, gingerbread village craft, nativity decor DIY, Christmas present box, easy holiday crafts
*Originally shared by [@cheerstomonday](https://www.instagram.com/cheerstomonday)*